How to Build an API
Building an API takes much more than just programming a server.
You can think of building an API as a workflow consisting of several phases, each with its own additional steps. Regardless of which phase you are in, Apiary will improve your API workflow.
Preparation
A few key decisions need to be made before you can start building your new API. In this preparation phase you should define the application domain semantics, decide what API architectural style you are going to use, and form an API style guide.
In organizations with many APIs, the formalization of these steps leads to increased consistency and improves the overall developer experience.
Define Domain Semantics
What is the thing you’re describing? Is it a chair or a bench? At first sight, it may feel obvious or even trivial to define the semantics of your application domain. However, make sure you list all the terms used in your application and get everybody on the same page of what they mean.
Being clear on what things are and what they mean is the foundation of all communication—even more so when it comes to an API.
Choose Architectural Style
What will be the architecture style of your API? Will it be event-driven, URI CRUD-based or a Hypermedia API? Each style has its advantages and disadvantages. There is no silver bullet. Functionality aside, some architectural styles are easier and faster to implement, while others offer benefits like scalability and evolvability.
Pick the appropriate architectural style for your application and make sure it is clearly communicated.
Formalize Style Guide
The Style Guide defines the conventions of your API—such as the media type you're going to use, the kind of authentication you will put in place, or the way you will paginate results. It also covers the naming conventions, URI formatting. Think of it as a coding style guide for your API.
Write down the conventions in a clear and concise form.
Design & Prototype
It is time to start carving out the API. In this phase, you will define how the API will look, create its stub implementation, and verify it with everybody involved in the workflow.
Identify Resources
What are the resources exposed in your API? Look at the terms in your application domain. Probably not all of the terms are resources on their own. Some of them represent resource attributes or affordances (i.e. the actions a resource might afford).
For example: A door may be a resource whereas color and door handle are its attributes, and open and close are the actions the door may afford.
Break down the domain terms, create their data models, and where appropriate, mark these models as resources.
Define Resource States
Often a resource may have more than one state. The door may be closed or opened. A message may be drafted, sent or archived.
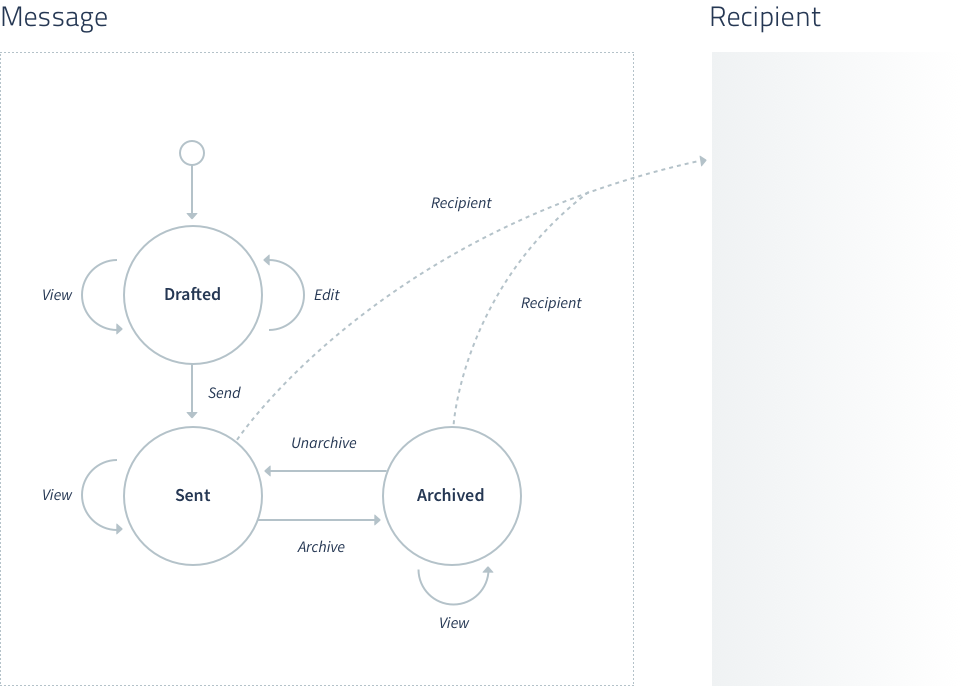
You may draw a finite state machine diagram to identify the states of your resources and discover the relations between resources. This state machine diagram will help to recognize what resources are really needed and what resources are just data attributes. In addition, the finite state machine diagram helps you to understand how the API might be implemented.
Write API Description
At this point, you should have a clear idea of your API’s architectural style, resources, relations and the API style guide. It is time to formalize these in one of the API Description formats like API Blueprint or Swagger. Using an API Description format helps you to design and prototype your API without writing any code.
Log into Apiary, create a new API project and write everything we have discussed so far into the Apiary editor.
If you are unsure about what API Description format to use check the Choosing the right format article.
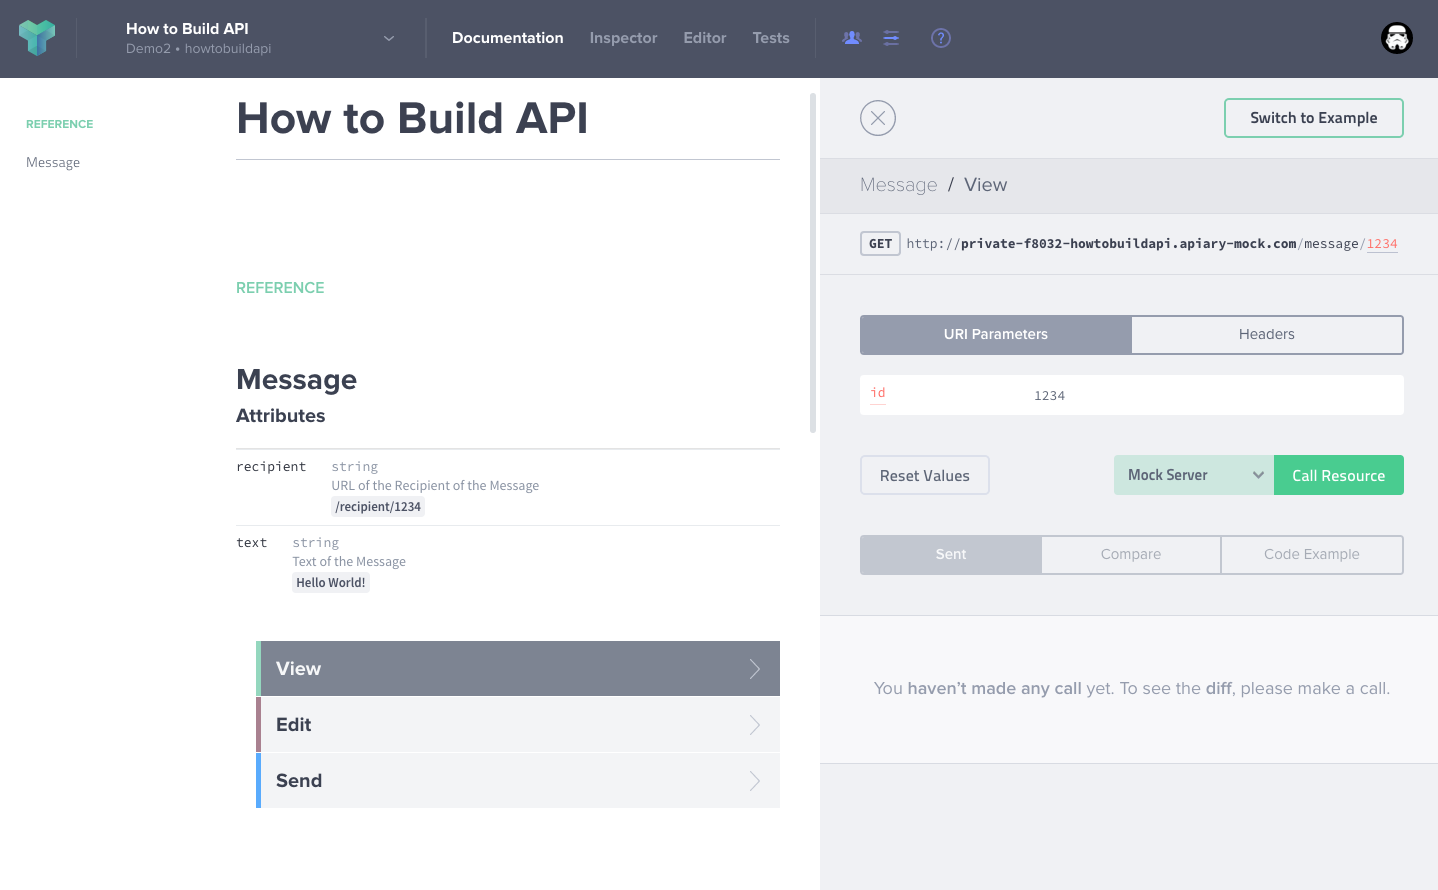
## Message [/message/{id}]
- Parameters
    - id: 1234 (number) - Internal id of the Message

- Attributes
    - recipient: /recipient/1234 (string) - URL of the Recipient of the Message
    - text: Hello World! (string) - Text of the Message

### View [GET]
- Response 200 (application/json)
    - Attributes (Message)
To get started with API Description formats review its tutorials the API Blueprint tutorial or the Swagger tutorial.
Use Apiary Mock Server
To enable quick prototyping, Apiary provides you with a hosted Apiary Mock server. Anytime you edit your API description, the mock server gets updated so you can immediately use the prototype.
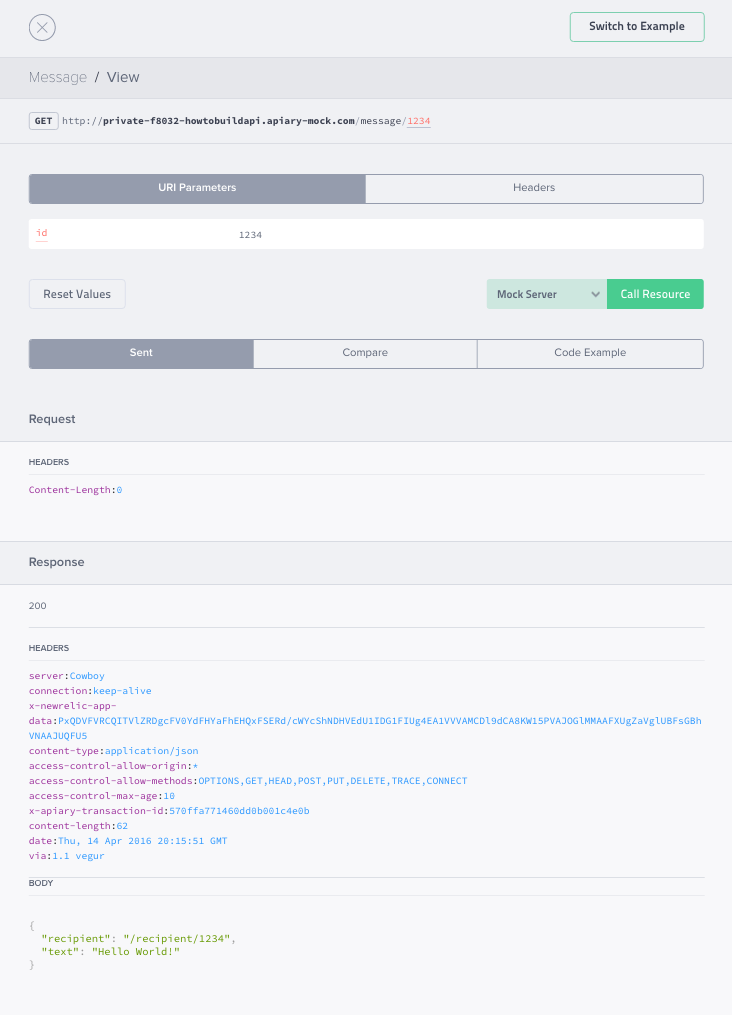
You can interact with the Mock server directly from the Apiary Documentation console.
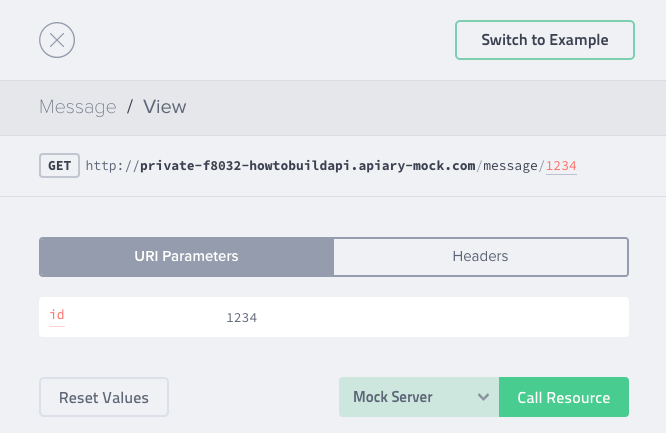
You can also call the Apiary Mock server from a command line, using a HTTP client (such as Paw) or directly from your API client.
$ curl http://private-f8032-howtobuildapi.apiary-mock.com/message/1234
{
  "recipient": "/recipient/1234",
  "text": "Hello World!"
}
The Apiary Mock Server will enable you to quickly iterate on your API designs as well as allow you to start working on an API client before the API server is implemented.
Put API Description on GitHub
Having your API description on GitHub will make versioning, sharing and collaboration a lot easier.
Apiary provides a GitHub Syncoption, which keeps your API description in Apiary synchronized with the latest changes on GitHub and vice versa. Thanks to GitHub Sync you can focus on version control and collaboration without worrying about the API Documentation or Mock Server. GitHub Sync will always keep them up to date.
Furthermore we strongly encourage you to utilize the GitHub flow while iterating on the API design. Apiary offers complete GitHub Integration so you can freely create and switch between the branches while working on your API description.
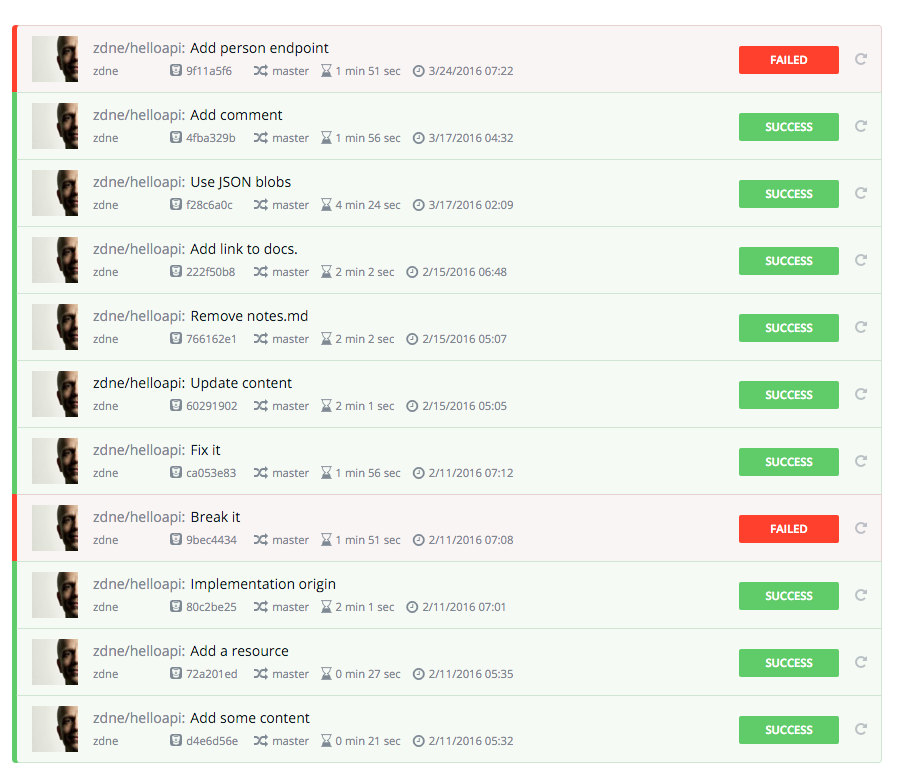
Make sure to provide meaningful commit messages while submitting a new version of API description.
$ git log --pretty=oneline --abbrev-commit
ba82477 Explain rate limits
e191752 Add rate limiting
f5c4576 Introduce `archive` and `unarchive` actions for the `Message` resource
2049da5 Add the `Message` resource
d1ca0d1 Initial proposal of the API design
Descriptive commit messages in your API description contribute to the overall clarity of communication between API design stakeholders, which eases the navigation between different iterations of an API design.
Share and Review
The sooner you get feedback from API consumers and stakeholders, the better it will be for your API design. Before moving on to the development or the consumption make sure your API description is approved and all remarks are addressed.
Circulate Apiary Documentation with everybody involved in the whole API flow. Ask them for a review of the API description on GitHub. Make sure the API description is conforming to the Style Guide.
With the API description approved, you can move forward to server development, and—using the Apiary Mock Server—to building its clients in parallel.
Development
All is set, let’s build the server! In this phase you will build the API implementation according to the API design you have created in the Design and Prototype Phase. The API implementation will be automatically tested against its design so everybody knows it’s living up to the agreed contract.
Put the API Description next to Implementation
Once approved, the API Design you have created in the Design and Prototype phase represents a contract with everybody involved in the API lifecycle. You can think of the API description as a formalized agreement between the API provider and API users or the API product owner and API developers.
When it comes to the implementation of this contract, you’ll want to check regularly that it is conforming to the contract, especially when either one changes. If the contract (API design formalized in the description) changes, you’ll need to verify the implementation is still matching the contract (and vice versa).
To make the monitoring of the contract and implementation changes easier, we suggest that you put the API description into the same repository as the implementation.
Apiary comes with seamless GitHub Sync so your API description stored on GitHub always stays in sync with Apiary. If you want to utilize the GitHub flow while you are working on multiple versions of API descriptions, you can take advantage of the complete Apiary GitHub Integration.
In either case, make sure your API description is right next to the code so you always know what the implementation should conform to.
Develop Server
Finally the moment we all love–writing the code!
It is completely your choice what programming language, framework or platform you are going to use to implement your API. The hard work of writing the implementation is up to you, but Apiary is here to help you verify your implementation.
The next few steps will teach you how to test your implementation locally or as part of a continuous integration.
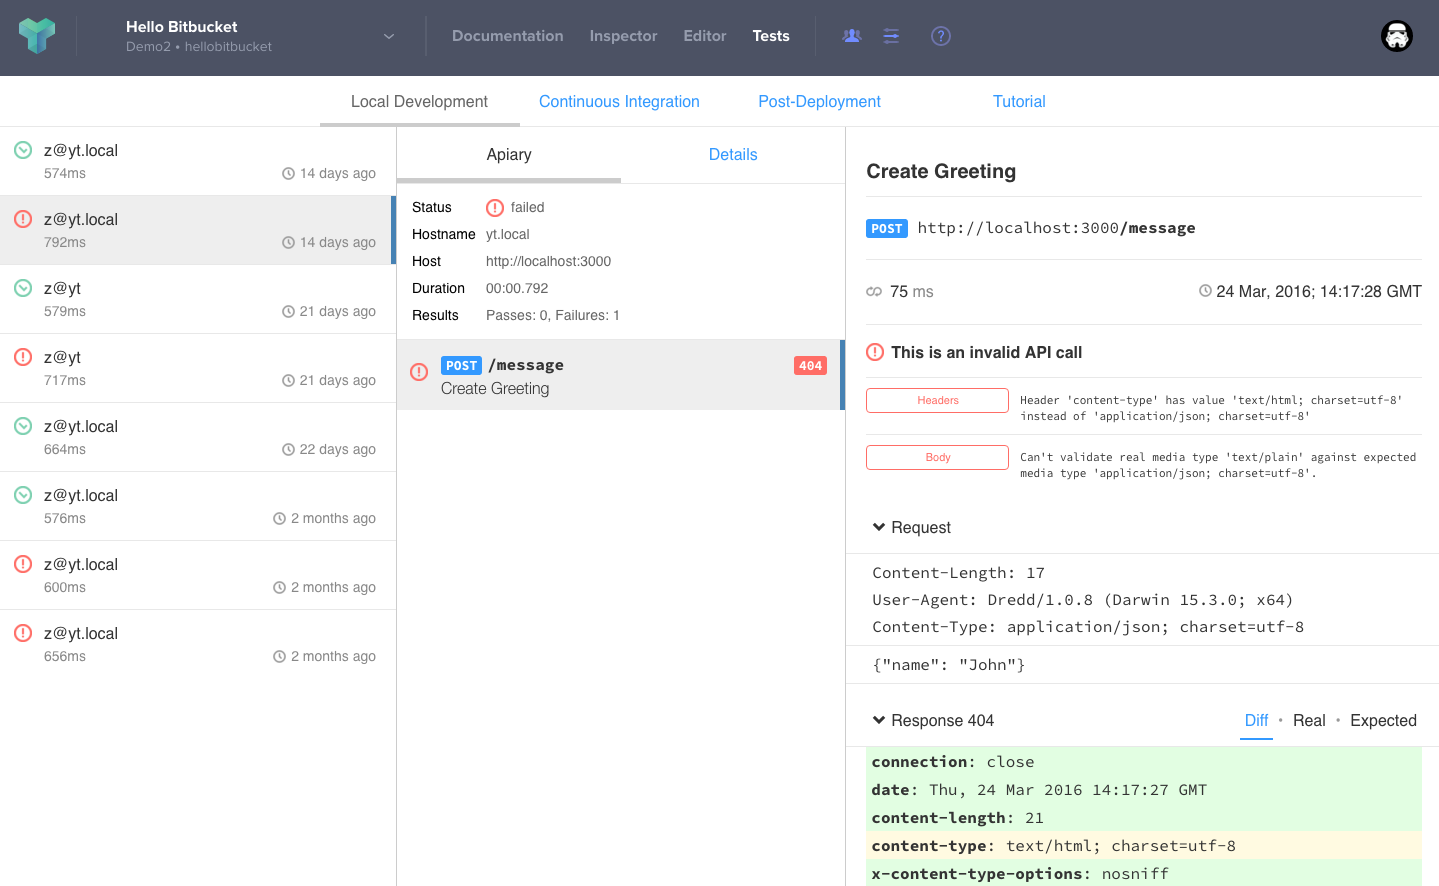
Test Server Locally
Testing an API locally with Apiary is easy. You do not have to write any tests because you already have your API description.
Apiary has created the API testing framework Dredd. With Dredd you can test your API implementation locally against its API description in an instant.
The way it works is quite easy. After the installation and setup of the Dredd, run
$ dredd
The Dredd tool will start a local instance of your server, take your API description and exercise every endpoint found in the description against the locally run server. It will report any disparities and errors.
Whether you want to test at leisure or as part of a test-driven development workflow, Dredd is here to help.
Test Server in CI
Once you are familiar with the local testing with Dredd, you can set a continuous integration (CI) service to test your API implementation. Dredd and Apiary support all of the popular continuous integration services.
Applying continuous integration and hosting your API description in the same repository as your implementation enables automatic test runs when anything changes. This assures your API implementation is in accordance with the API description.
Set up a continuous integration in your API implementation repository to be sure that your server is always implementing what is said in your API description.
Use Apiary Test Reporter
To help you even further with the testing of your API Implementation, Apiary offers the go-to place for your API test results. Regardless of whether your tests were run locally or in a continuous integration, Apiary Test Reporter offers a comprehensive and easy to use overview of all API Implementation tests.
Visit the Apiary Test Reporter and set up its integration with your local development and continuous integration tests.
Deploy
With everything implemented and tested as described in the API description, you can deploy your API.
No matter where you deploy your API it is a good idea to add both operational and functional monitoring so you can follow the health of your service and analyze the API usage in the Analysis Phase.
Delivery
With your API implementation developed, tested and deployed, it is time to deliver it to the clients. You can share your API with its users in many ways, from handing out the API description to providing them with a beautiful customized interactive documentation.
Share the API Description
Share Apiary Documentation
We believe the best way to deliver your API is to hand out the Apiary Interactive API Documentation. To do so, simply copy its URL and share it with your API users. This is as simple as sharing your API description directly, but it will provide the user with a much better experience than reading an API description and there are many tools to help in using the API.
If you are using Apiary GitHub Sync and your GitHub repository is public, your API users will be able to see its API description and submit pull requests to it. Do not forget that your Apiary Interactive API Documentation is always in sync with your API description on GitHub, and if you have set up the continuous integration it is always tested.
Share your Apiary Interactive API Documentation URL with your API users.
Embed Apiary Documentation
If you would like to embed your Apiary Interactive Documentation in your website and customize its look and feel, you can do so with the Apiary Embedded Documentation.
A great example of an embedded and customized Apiary Interactive API Documentations can be found at CSAS’s developers portal.
API Management
Based on your organization's requirements, you might want to employ an API management system to publish, promote, and monitor your API. This may also include the support of API consumers.
There is a plethora of API management tools and solutions. We suggest picking a solution that best matches your needs and plans for the API. If your organization is already using an API management tool, you may embed Apiary Documentation in it.
Consumption
At this point your API is implemented and deployed. Your API users can start working on the client, but they do not have to wait until the API is developed to get started. With the Apiary Mock Server they have a prototype and a stub implementation of your API that can be used to build the client.
In this phase your API users will build their clients with the help of the tools Apiary is providing.
Use Apiary Documentation
The first step to understand an API is to read its documentation. A wise man once said: “An API is only as good as its documentation”. That is why Apiary automatically provides your API with the best API interactive documentation.
To start consuming an API read its documentation and identify the API parts you want to interact with.
Use Apiary Documentation Console
The Apiary Documentation console enables you to interact directly with your API without the need to leave the documentation.
With the console you can make API requests to learn about the behavior of the API and how to use it.
Use Language Examples
To further speed up and simplify the consumption of your API, Apiary Documentation comes with Code Examples in variety of languages.
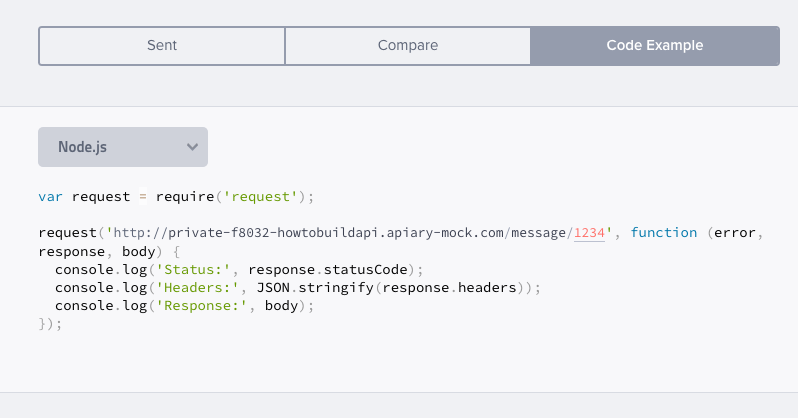
Copy and paste the code examples in your favorite language and run the request. The code example always includes the full URL of the request be it mock or deployed API.
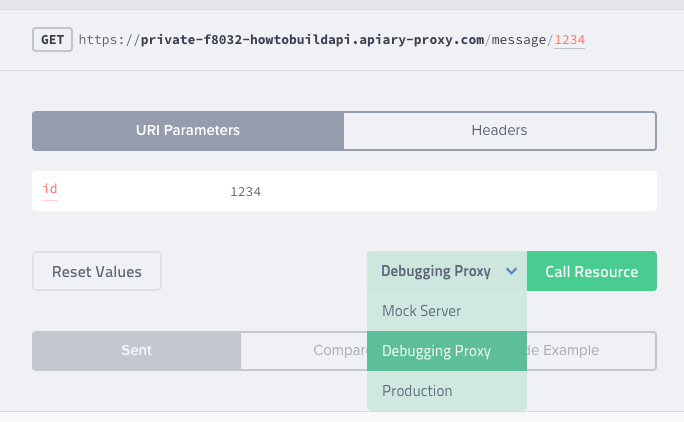
Use Apiary Traffic Inspector
Apiary Traffic Inspector is a debugger for your client’s calls. With it, you can pinpoint where a problem is in a client server communication.
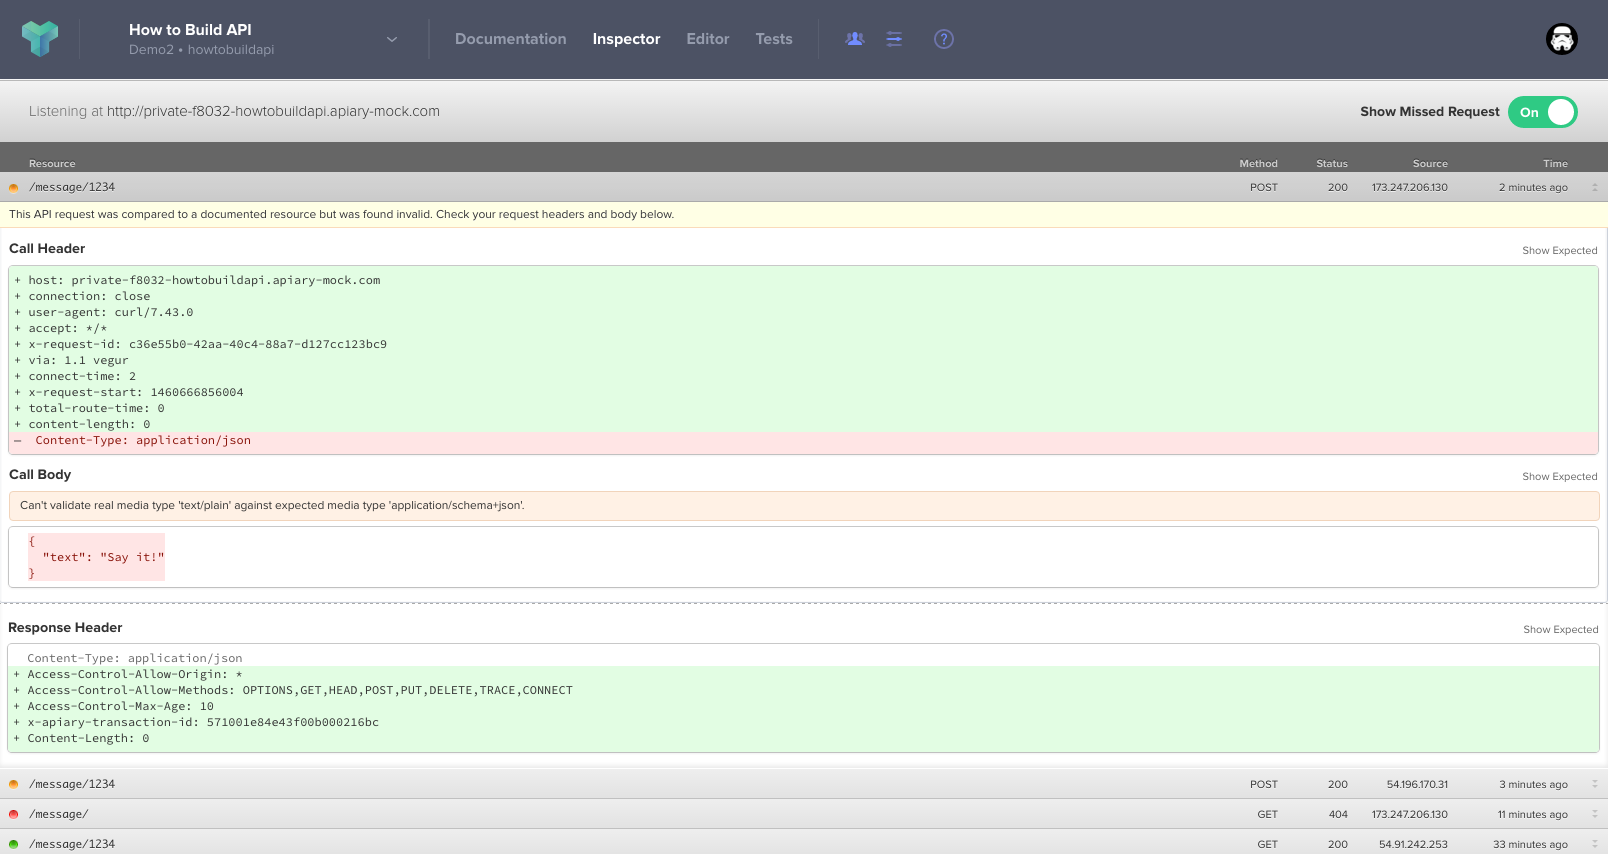
With every call, you see what data has been sent by the client and what was sent by the server in response.
Every call from any client to the Apiary Mock Server is recorded. You can also monitor calls made to your deployed API using the Apiary Proxy feature.
Develop Client with Apiary Mock Server
With Apiary Mock Server you can start working on your API client before (or in parallel) to API development.
Just point your client to the same Apiary-hosted stub implementation you have used to verify your API design in the Design and Prototype phase.
While working on the client, you can use the Apiary Traffic Inspector to debug the traffic between the client and server.
The sooner you start working on your API client, the sooner you might discover and address potential problems with your API design and the sooner you will deliver your client to the market.
Develop Client with Apiary Proxy
If your API is already developed and deployed, you can build your API client using the Apiary Proxy.
The Apiary Proxy feature relays your requests made to your deployed API. It also records all the traffic and reports it to the Apiary Traffic Inspector for debugging.
Analysis
The work is never done. Measuring the API usage and listening to the feedback during every phase is the key to a successful API.
Collect the Feedback
There are numerous ways to collect feedback about your API.
Every phase of the API design workflow involves different stakeholders working on the API.
During the Design and prototype phase the input from API product owners, organization architects and API consumers is essential for good API design.
The Development phase brings challenges to server developers. Their feedback might help improve both performance and security of the API.
Finally, the Delivery and Consumptions phases put your API to the ultimate test by its users. Here you may learn if the API is delivering what was expected, verifying it as a product.
Iterate
Analyze the feedback during every phase. Often, the input can be immediately reflected in an updated version of your API design, restarting the API workflow.
You do not have to wait until all the phases are passed to address a feedback. Thanks to Apiary, you can can quickly iterate in your API workflow. With the integrated tools you can rest assured everything is up-to-date with any API description change. And if your API implementation gets out of sync, you are immediately informed thanks to the testing in CI.
It is difficult to come with the right API design in the first pass of your API workflow. Do not hesitate to iterate over and over through the whole API workflow and its phases. Apiary has you covered.